How to Automate Emails with Python for Beginners Part 1
- Jul 8, 2020
- 4 min read
What we will cover
In this blog post we will be taking a look at how to login to your email account with Python and send an email to any email address. We will also take a look at how to overcome any issues which may arise when sending an email through Python (i.e. Google security alert warning preventing emails from being sent).
Let's Get Started - Download Python 3
Head over to this website: https://www.python.org/downloads/
Click on the download button to install the latest version of Python 3 for your operating system. Then you can simply follow the steps to install Python and we can soon begin to automate our emails!
Python 3rd Party Module Installations
Open up the command line on your computer and we will begin to install some 3rd party modules for Python. Essentially, what this means is we are going to be installing packages which enable additional features to be accessed within Python. So once you are at your terminal, you can type the following command:
If you are on Mac run this command:
pip3 install mime If you are on Windows run this command:
pip install mime For Mac you need to call pip3 which specifically correlates to Python 3 whereas when executing this line in Windows it doesn't matter.
Now Let's Start Coding in Python
STEP 1
So first of all within Python you have to begin importing the package we installed as well as another package which comes pre-installed with Python.
import smtplib
from email.mime.text import MIMEText
The above two lines will go right at the top of the code as by convention you always import the packages at the top of the program.
STEP 2
Now we can go ahead and create a few variables which will hold important details such as your email and password.
from_email = "myemailaddress"
from_password = "mypassword"
outgoing_server = "smtp.gmail.com"
smtp_port = 587
The above block of code can next be written to provide the details required to login and send the email. You have essentially provided your email address and password for the account you wish to send the email from. Now the last couple lines of this code block may be confusing. The outgoing server is essentially the server you wish to send the email from, this will vary depending on whether you are using gmail or outlook or some other email platform. For outlook you will use "smtp.live.com", now if you are using a different emailing platform it should be as easy as looking up "outgoing server for ..." which should show you something similar to the gmail and outlook servers. Lastly, we have the smtp port. Now SMTP refers to Simple Mail Transfer Protocol which is essentially a computer protocol which assists with sending emails so this port number is essential and tends to be either 465 or 587. So if it doesn't work with one you can obviously try the other and if neither work you can simply look it up like we did with the outgoing server.
STEP 3
Okay, so next we can move on to providing the contents of the email. We will need to declare some new variables which will hold the receivers email address, the subject and the body of the email.
to_email = "receiversemailaddress"
subject = "thisisthesubject"
message = "thisisthemaincontentoftheemail"
This step should be pretty self explanatory. We have provided the email of the receiver, the subject and then the message of the actual email itself. When it comes to providing a message, this can also be entered in HTML to provide a more styled email. In order to do this you can go to a website where they can convert text into HTML for you and this can then be copied and pasted here as the message for your email. Just drop me a message if you want any help with this :)
STEP 4
Now, moving on we can begin to use the modules we have imported to create the actual message which will be stored in a MIMEText object.
msg = MIMEText(message,"html")
msg['Subject'] = subject
msg['To'] = to_email
msg['From'] = from_email
The above code begins by creating the actual message which is stored under the "msg" variable name. We have also declared the format of this message as HTML which allows HTML code to be written as the message body allowing for different fonts and colours to be used in the email. Then we go on to set out desired subject, recipients email and the email address it's from.
STEP 5
Lastly, we can begin to login and send the email!
sending = smtplib.SMTP(outgoing_server,smtp_port)
sending.ehlo()
sending.starttls()
sending.login(from_email,from_password)
sending.send_message(msg)
So in the first line of this block of code, we have created an SMTP object where we have stated the server and port number we will be using. This is stored under a variable called sending. On the second line, we have the EHLO command which is where the client is acknowledging the server to say we are ready to send an email. Then the next line allows the email to be securely sent which is very important. And finally the last two lines are referencing the variables we created earlier and are essentially replaced with the values of the variables. This is where we login and send the actual message itself.
Running the Code
In order to run the code, go to "Run" at the top of the window and click "Run Module" which will send your email!
Troubleshooting
1. Gmail Security Alert - go to manage your google account --> security --> turn on access for less secure apps
Please let me know if there are any other issues you have encountered so I can look into them and update this article if necessary :)
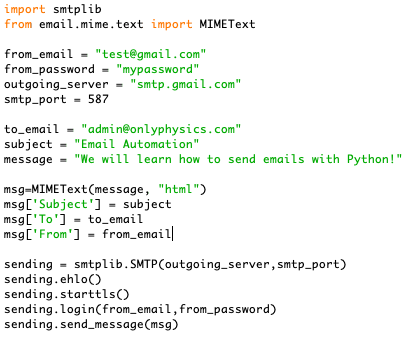
Final Code!
If you found this post helpful, don't forget to come back soon and check out the next part where we will learn how to use Python to read an excel file with several email addresses and send emails to each of them!


Comments